
主要内容:
用连接文本提案网络检测自然图像中的文本
来源:
https://github.com/Li-Ming-Fan/OCR-DETECTION-CTPN
- Zhi Tian, Weilin Huang, Tong He, Pan He, Yu Qiao: Detecting Text in Natural Image with Connectionist Text Proposal Network. ECCV (8) 2016: 56-72
作者目的:
- 做一个有趣的应用
- 预测图片旋转角度
Abstract:
-
We propose a novel Connectionist Text Proposal Network (CTPN) that accurately localizes text lines in natural image. 提出一种新型的连接式文本建议网络,可以精准定位自然图片中的文本行
-
the ctpn detects a text line in a sequence of fine-scale text proposals directly in convolutional feature maps. we develop a vertical anchor mechanism that jointly predicts location and text/non-text score of each fixed-width proposal, considerably improving localization accuracy.
ctpn直接在卷积特征图中检测一系列精细文本提案中的文本行。我们开发了一种垂直定位机制,联合预测每个固定宽度方案的位置和文本/非文本分数,大大提高了定位精度。
-
the sequential proposals are naturally connected by a recurrent neural network, which is seamlessly incorporated into the convolutional network, resulting in an end-to-end trainable model. this allows the ctpn to explore rich context information of image, making it powerful to detect extremely ambiguous text.
顺序建议自然通过递归神经网络连接,该神经网络被无缝地集成到卷积网络中,从而形成一个端到端的可训练模型,这使得ctpn能够探索丰富的图像上下文信息,从而强大地检测出极端模糊的文本。
-
the ctpn works reliably on multi-scale and multilanguage text without further post-processing, departing from previous bottom-up methods requiring multi-step post filtering.
ctpn在多尺度和多语言文本上工作可靠,无需进一步的后处理,有别于以前需要多步后滤波的自下而上方法。
-
it achieves 0.88 and 0.61 f-measure on the icdar 2013 and 2015 benchmarks, surpassing recent results [8,35] by a large margin. the ctpn is computationally efficient with 0:14s=image, by using the very deep vgg16 model [27]. online demo is available at: http://textdet.com/
它在2013年和2015年的icdar基准上实现了0.88和0.61 f-度量,大大超过了最近的结果[8,35]。ctpn使用非常深的vg 16模型[27],计算效率为0:14s=Image。
Method:
- Convolutional neural networks
RNN:
-
CNN+LSTM

好句集锦:
- make the content of the tutorial accessible for anyone with minimum programming skills
- beginner’s tutorials 初学者教程
- One of the often-heard difficulties(经常听到的困难) of deep learning algorithms is that they need to be trained on very large datasets to work effectively.
- At the end of this post, you will (hopefully) know how to train a convolutional neural network on data generated on-the-fly(即时生成的数据上) to predict the rotation angle(预测矫正图像方向所需的旋转角度)needed to correct the orientation of a picture.
- Artificial neural networks are machine learning algorithms vaguely inspired by biological neural networks. Different (artificial) neural network architectures are used to solve different tasks.
问题描述:
-
图片矫正
-
Some software tools have the capability to straighten them, provided that the image is already in the right orientation. 某些软件可以将它们拉直
-
To illustrate that, let’s take a look at the Level tool of Adobe Photoshop Lightroom. As you can see in the images below, this kind of tool can correct small rotations with high accuracy (look at the edge of the road as a reference for the horizon).为了说明这一点,让我们来看看Adobe Photoshop Lightroom的Level工具。 正如您在下图所示,这种工具可以高精度地校正小旋转(将道路边缘视为地平线的参考)。
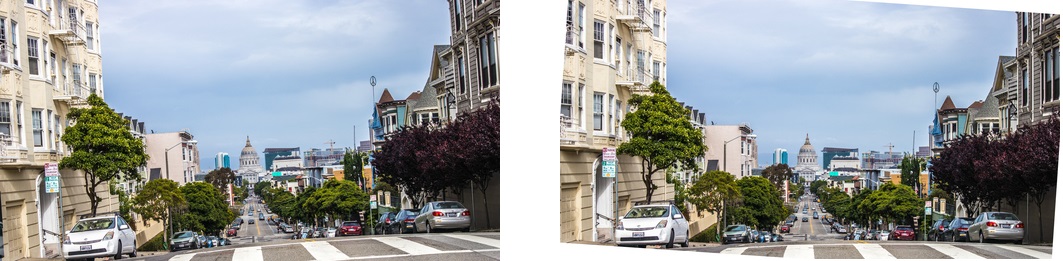 Left: Original image. Right: Image corrected with Lightroom’s Level tool.
But what happens if the image is upside down? As you can imagine, similar to the previous case, the corrected image is simply a straight version of the original.可以想象,与前一种情况类似,校正后的图像只是原始图像的直线版本。
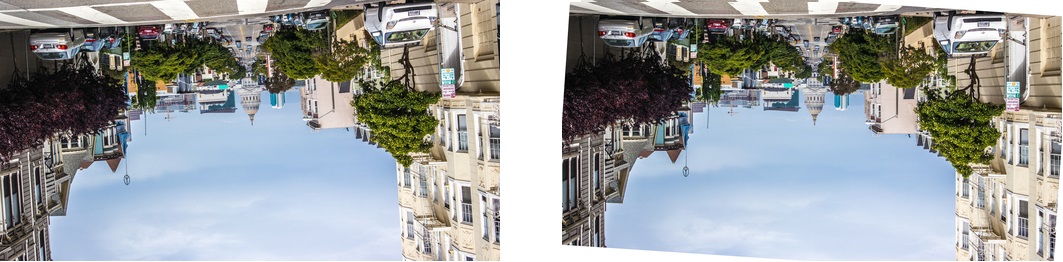 Left: Upside-down version of the original image. Right: Image corrected with Lightroom’s Level tool.
 - Tools like this make use of image processing techniques to look for horizontal edges in the image and use them to rotate it in such a way that those edges are completely aligned with the horizon after the correction.像这样的工具利用图像处理技术来寻找图像中的水平边缘,并使用它们旋转它,使得这些边缘在校正后与地平线完全对齐。
- But what if we want the upside-down image to look like the original one? In order to do that we need an algorithm that can interpret the content of the image and act accordingly. 但是,如果我们希望倒置的图像看起来像原始图像呢? 为了做到这一点,我们需要一种能够解释图像内容并相应地采取行动的算法。
- In the previous case, we would easily figure out that the image is upside down by acknowledging the position of the sky and the road. 在前一种情况下,通过确认天空和道路的位置,我们可以很容易地发现图像是颠倒的。
- As you can image, this is the type of task that deep learning algorithms excel at. As you will see in the remainder of this post, this problem can be easily solved using a convolutional neural network.正如您可以想象的那样,这是深度学习算法擅长的任务类型。 正如您将在本文的其余部分中看到的,使用卷积神经网络可以轻松解决此问题。
使用keras预测旋转角度
- however, TensorFlow is somewhat low level and it can be a bit verbose, especially when it comes to defining deep neural networks.然而,TensorFlow有点低级别,它可能有点冗长,特别是在定义深度神经网络时。
- If you write raw TensorFlow code, you will probably end up writing a lot of helper functions to compose your models. Instead, a popular option is to use one of the many available libraries that wrap TensorFlow’s low-level functionality into high-level reusable functions.如果您编写原始TensorFlow代码,您可能最终会编写许多辅助函数来编写模型。 相反,一种流行的选择是使用许多可用库中的一个将TensorFlow的低级功能包装到高级可重用功能中。
- Everyone has their favourite. Google itself has added two of them to TensorFlow’s contrib module (TF Learn and TF-Slim) and another one to their main GitHub repository (PrettyTensor).每个人都有他们的最爱。 谷歌本身已将其中两个添加到TensorFlow的contrib模块(TF Learn和TF-Slim),另外一个添加到他们的主要GitHub存储库(PrettyTensor)。
- My favourite is Keras, although I have to say I haven’t tried all of them. Keras is built entirely with TensorFlow under the hood, so you can use it even if you are not familiar with it. 我最喜欢的是Keras,虽然我不得不说我没有尝试过所有这些。 Keras完全由引擎盖下的TensorFlow构建,因此即使您不熟悉它也可以使用它。
- You can also use it with Theano, another popular deep learning framework, as a backend. As you will see in the code snippets below, Keras code is very easy to write and extend thanks to its simple and modular design.您还可以将其与另一种流行的深度学习框架Theano一起用作后端。 正如您将在下面的代码片段中看到的那样,由于其简单的模块化设计,Keras代码非常易于编写和扩展。
数据准备:
-
The first thing we are going to do is to prepare the data. When preparing data for deep learning applications, we need to think about the format of the input data and the format of the output data (the labels). 我们要做的第一件事就是准备数据。 在为深度学习应用程序准备数据时,我们需要考虑输入数据的格式和输出数据的格式(标签)。
-
In our case, the format of the input data is clear: we want the network to process images. The output seems to be clear too. We need the network to predict the image’s rotation angle, which can then be used to rotate the image in the opposite direction to correct its orientation.在我们的例子中,输入数据的格式很明确:我们希望网络处理图像。 输出似乎也很清楚。 我们需要网络来预测图像的旋转角度,然后可以使用该旋转角度沿相反方向旋转图像以校正其方向。
-
However, the output can be formatted in two different ways. One option is to predict a single value between 0 and 359 (or between 0 and 1 if normalised). This type of task is called regression. In this case, the label is simply the true value representing the rotation angle.但是,输出可以以两种不同的方式格式化。1) 一种选择是预测0到359之间的单个值(如果标准化则预测在0和1之间)。 这种类型的任务称为回归。 在这种情况下,标签只是表示旋转角度的真值。
-
In this case, the label is simply the true value representing the rotation angle. In a regression task, the loss function could simply be the absolute difference between the predicted value and the true value, also known as the mean absolute error (MAE). 在这种情况下,标签只是表示旋转角度的真值。在回归任务中,损失函数可以简单地是预测值和真值之间的绝对差值,也称为平均绝对误差(MAE)。
-
This could easily be solved using a loss function that correctly computes the minimum difference between two angles.MAE并不是最好的选择,eg:350度与10度,使用能够正确计算两个及哦啊度之间的最小差异的损失函数
-
However, the output can be formatted in two different ways. 输出可以以两个不同的方式格式化。
-
The second option is to predict a class label. This type of task is called classification. If we want to treat our problem as a classification one, the network should produce a vector of 360 values instead of a single value. 2)预测分类标签,应该生成一个360值而不是单个值的向量, 其中向量的每个值,表示每个类中,0-1之间的概率是正确的还是错误的。
-
The first entry of the vector would correspond to 0 degrees, the second entry to 1 degree, and so on. In this case, the label is a binary vector that contains 1 only in the entry that accounts for the true value. For example, if the network sees an image rotated 40 degrees, the output should ideally be a vector containing 0 (0% probability) at each entry except 1 (100% probability) in the 40th entry in order to match the label.
-
So now we know the format of our data, but how do we get it? Luckily, for this particular application, we can easily generate it ourselves. We simply need images with an orientation angle as close to 0 degrees as possible. 需要方向角,尽可能为0的图像,将旋转角度作为标签。
-
I have done experiments with two different datasets: the MNIST database of handwritten digits (we are not going to classify them, I promise!) and the Google Street View dataset.手写数字(MNIST), Google街景数据集
-
Keras makes it very easy to write data generators by extending one of the provided classes. In the code below you can see a basic implementation of a data generator that takes a NumPy array of input images and produces batches of rotated images and their respective rotation angles on-the-fly. This generator can also preprocess the input images if needed. Keras通过扩展其中一个类, 可以很容易地编写数据生成器,下面数据生成器,采用numpy 作为输入图像阵列,并在运行中批量旋转,计各自的角度
class RotNetDataGenerator(Iterator): def __init__(self, input, batch_size=64, preprocess_func=None, shuffle=False): self.images = input self.batch_size = batch_size self.input_shape = self.images.shape[1:] self.preprocess_func = preprocess_func self.shuffle = shuffle # add dimension if the images are greyscale 如果是灰度图片增加一个维度 if len(self.input_shape) == 2: self.input_shape = self.input_shape + (1,) N = self.images.shape[0] super(RotNetDataGenerator, self).__init__(N, batch_size, shuffle, None) def next(self): with self.lock: # get input data index and size of the current batch index_array, _, current_batch_size = next(self.index_generator) # create array to hold the images 用数组创建图片 batch_x = np.zeros((current_batch_size,) + self.input_shape, dtype='float32')ten # create array to hold the labels 存储标签 batch_y = np.zeros(current_batch_size, dtype='float32') # iterate through the current batch for i, j in enumerate(index_array): image = self.images[j] # get a random angle rotation_angle = np.random.randint(360) # rotate the image rotated_image = rotate(image, rotation_angle) # add dimension to account for the channels if the image is greyscale if rotated_image.ndim == 2: rotated_image = np.expand_dims(rotated_image, axis=2) # store the image and label in their corresponding batches batch_x[i] = rotated_image batch_y[i] = rotation_angle # convert the numerical labels to binary labels batch_y = to_categorical(batch_y, 360) # preprocess input images if self.preprocess_func: batch_x = self.preprocess_func(batch_x) return batch_x, batch_y -
Note that we need to add a new dimension to the images when they are greyscale in order to account for the channels. This is because Keras models expect input data with the following shape (assuming TensorFlow ordering):
(batch_size, input_rows, input_cols, input_channels).在图像为灰度时添加新尺寸
RotNet on MNIST
-
Keras already comes with a script to load it:
# we don't need the labels indicating the digit value, so we only load the images (X_train, _), (X_test, _) = mnist.load_data() -
The shape of the training set
X_trainis(60000, 28, 28), and the shape of the test setX_testis(10000, 28, 28). In other words, we have 60,000 greyscale images of size 28 × 28 pixels for training and 10,000 of them for testing. 60000个尺寸为28*28的灰度图 -
After loading the data we can define our first convolutional neural network. How do we do this? If you are a beginner, the easiest way is to copy the architecture used in another example. In this case, I am using the CNN architecture used in the Keras example to classify the digits in the MNIST dataset:加载完之后,可以定义一个卷积神经网络
# number of convolutional filters 过滤器 to use nb_filters = 64 # size of pooling area for max pooling pool_size = (2, 2) # convolution kernel size kernel_size = (3, 3) nb_train_samples, img_rows, img_cols, img_channels = X_train.shape input_shape = (img_rows, img_cols, img_channels) nb_test_samples = X_test.shape[0] # model definition input = Input(shape=(img_rows, img_cols, img_channels)) #指定网络的输入形状,等于输入数据的尺寸 #下面是两个连续的卷积层,这些层采用内核大小以及nb_filters x = Convolution2D(nb_filters, kernel_size[0], kernel_size[1], activation='relu')(input) x = Convolution2D(nb_filters, kernel_size[0], kernel_size[1], activation='relu')(x) # 最大池化层, 将内核大小pool_size作为输入参数 # 池内核为2*2,输出形状是前一层书出的一半 x = MaxPooling2D(pool_size=(2, 2))(x) # 将其输入的一小部分(第一个丢失层中的0.25)设置为0,这种类型的层有助于 x = Dropout(0.25)(x) # Flatten层将三维输入转换成一维,因为Decse接下来会有一层,这是keras为完全连接的层提供的名字 x = Flatten()(x) x = Dense(128, activation='relu')(x) x = Dropout(0.25)(x) # nb_classes与预测类数量相同的输出数量,最后一层采用softmax进行激活 x = Dense(nb_classes, activation='softmax')(x) model = Model(input=input, output=x) -
if you want to see the output shape of each layer and other useful information like the number of weights, you can run
model.summarize()after the model is defined。查看输出形状和其他有用信息,eg:权重数, -
接下来编译模型
# model compilation model.compile(loss='categorical_crossentropy', optimizer='adam', metrics=[angle_error]) -
During the compilation step, we need to define the loss function, optimizer and metrics that we want to use during the training phase. 损失函数,优化器
-
we will typically use
'categorical_crosentropy'as the loss function. -
The optimizer is the method used to perform the weight updates. Adam is a good default optimizer that usually works well without extra configuration.
-
we are using a function called
angle_erroras a metric度量. Metrics are used to monitor the accuracy of the model during training. Theangle_errormetric will be in charge of periodically computing the angle difference between predicted angles and true angles. -
Note that the
angle_errorfunction is not defined in Keras, but you can find it in the RotNet repository. During training, we will monitor the loss value and the angle error so that we can finish the process whenever they stop improving in the validation set.监控损失值,以及角度误差,以至于在验证集中停止改进时完成此功能 -
存在的一些问题: The rotation operation involves interpolating pixel values when the rotation angle is different than 90, 180 or 270 degrees. 涉及内插像素值,当旋转角度不同于90,180,270时
-
At low resolutions, this can introduce interpolation artefacts that could be learnt by the network.低分辨率下,可能会引起可由网络学习的插值假象
-
If that happens, the network would fail to predict the rotation angle when these artefacts are not present, for example, if the original image was already rotated or if it was rotated at a higher resolution.如果原始图像已经旋转或者它以更高的分辨率旋转。
-
In order to solve this issue, we will binarize the input images after rotating them, i.e. values below a certain pixel intensity will be converted to zero, and values above it will be converted to one. In this way, we reduce the effect of the interpolated pixels and therefore ensure that the network is not making predictions based on them.为了解决这个问题,我们将在旋转它们之后对输入图像镜像二值化,即低于某个像素强度的值将转为0,高于它的值转为1->减少了插值像素的影响,下面开始训练网络
-
对之前的
RotNetDataGenerator(生成具有不同图像的)产生的数据进行训练模型。通常只要网络已经被整个训练集馈送,就完成了一个时期。# training parameters batch_size = 128 nb_epoch = 50 # callbacks checkpointer = ModelCheckpoint( filepath=output_filename, save_best_only=True ) early_stopping = EarlyStopping(patience=2) tensorboard = TensorBoard() # training loop # 对之前的RotNetDataGenerator (生成具有不同图像的)产生的数据进行训练模型 model.fit_generator( RotNetDataGenerator( X_train, batch_size=batch_size, preprocess_func=binarize_images, shuffle=True ), samples_per_epoch=nb_train_samples,# 因为是动态生成数据,需要明确定义samples_per_epoch nb_epoch=nb_epoch, validation_data=RotNetDataGenerator( X_test, batch_size=batch_size, preprocess_func=binarize_images# 传递两个对象,以便对上述预处理输入图像 ), nb_val_samples=nb_test_samples, verbose=1, callbacks=[checkpointer, early_stopping, tensorboard] )